A time value can be specified which will force your password to be demanded when the machine is turned on if the specified time has elapsed since the machine was turned off. This will occur even if Fn-F was not used to turn the machine off. If the time value is set to zero, then a password will be required whenever the machine is turned on. Fn-F will still turn the machine off and always force a password prompt when the machine is turned back on.
If DOS is the active application, the blue (application) keys may be temporarily inoperative after entering your password until you push some other key such as a letter, arrow, or ESC.
[Change in version 3.] If the time value is not zero, then a date change (i.e., midnight crossing) while the machine is off will no longer force a password request when the machine is turned back on.
Screen scrambling can be enabled or disabled, or the TOPCARD can be used instead. If the TOPCARD method is used, after entering your password Buddy will re-open all suspended applications (except DOS) and then activate the application that was active when the machine was turned off. (Otherwise, all open applications would remain "behind" the TOPCARD.) If DOS was open but was not the active application when the machine was turned off, DOS will remain "behind" the TOPCARD until you manually activate it. This means that your DOS application will still be open even though the TOPCARD is showing -- an unusual and possibly confusing situation. If DOS was active, Buddy will always scramble the display instead of using the TOPCARD.
Whenever a password is required, if you (1) push TAB, (2) make three failed attempts to enter the password, or (3) just randomly push a lot of keys, the default owner file, "C:\_DAT\BUDDY.OWN", will automatically be called up in Filer View. You may prepare for that event by creating that file with Memo and entering your "100LX/200LX lost & found" instructions therein. You must put your BUDDY.OWN in the same directory as the ENV file (usually C:\_DAT\), and if you have renamed your ENV file (i.e., so it is not "BUDDY") you must also rename your OWN file.
If your OWN cannot be found, then your TOPCARD will be shown instead. Thus, you do not have to provide an owner file to cause your name, address and phone number to be displayed if you have entered that information in Setup. (If the TOPCARD is used in this manner, the same notes apply as above about open and active applications.)
There is a checkbox in the EXM that forces a password to be required whenever power is turned on. If that mode is active and if power is turned on due to an alarm, the screen will not be scrambled, although a password will still be required. As usual, enter your password first, then acknowledge the alarm.
The password prompt can be customized in the EXM.
(Attention 200LX users.) If you have the built-in 200LX password logic enabled (via PASSWORD \M and ON-ENTER or PASSWORD \A), Buddy will not ask for a password of its own. Caution: when you SET your 200LX built-in password, be sure Buddy or d-letter, d-gray, and SmartCaps are off. To do that, push CTRL-MINUS before STARTING the password program. If you do not do this, Buddy may silently alter your password as you enter it (e.g., "ook3" might be changed to "Ok?").
Keyboard Translation Features
There are numerous keyboard translation functions built into Buddy. They include:- Double-click a letter key ("d-letter") to get an upper-case letter.
- Double-click a gray key ("d-gray") to get a shifted symbol.
- Easy colon in pathnames ("d-slash").
- Automatically convert certain letters to upper case as you type (SmartCaps).
- Inhibit the blue keys and obtain a shifted symbol.
- Swap the blue keys with their shifted symbol.
- Undo any of the above.
- Double-click a blue key ("d-blue") to get the CTRL-blue key application.
- Remap the blue keys to activate other applications.
- Miscellaneous conversions.
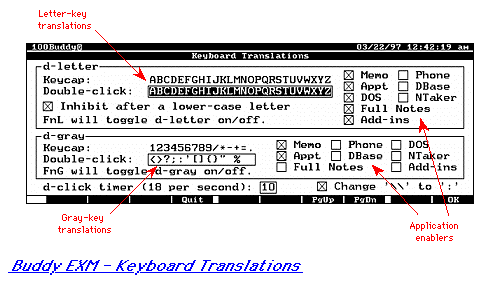
- Double-clicked letter keys will produce a single upper-case letter as long as the previous character was not lower case. The character produced (and the restriction) may be changed using the EXM ("d-letter"). To disable a particular key or keys from being double-click aware, specify a space as the output character. If you don't want the feature on at all, un-check all of the application boxes or use Fn-L. That keystroke will toggle the feature on and off in any application that has the feature enabled. (Fn-L may not work in DOS if sysmgr is unloaded.)
- Double-clicked gray keys will produce a single upper-case symbol. The character produced may be changed using the EXM ("d-gray"). To disable a particular key or keys from being double-click aware, specify a space as the output character. If you don't want the feature on at all, un-check all of the application boxes or use Fn-G. That keystroke will toggle the feature on and off in any application that has the feature enabled. (Fn-G may not work in DOS if sysmgr is unloaded.)
[New in version 3]: If SmartCaps and "dot after white-space toggles caps lock" are on, d-gray will be temporarily inhibited if you type a dot after white space.
- Pushing the backslash key twice will generate a colon. This is useful when typing pathnames. Three hits will give you ":\". Note that this feature does not use the d-click timer, so you can type slowly.
- SmartCaps. This deserves a section of its very own, just below.
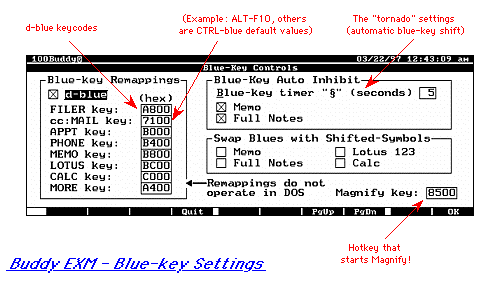
- The blue-keys can be temporarily disabled while you are typing, and, when a blue-key is hit, the shifted symbol will be produced instead without having to hit the shift key. This feature is controlled by a blue-key timer setting in the EXM. The timer restarts whenever you hit a character key and is cleared by a cursor movement key or by ESC. When the timer is running, a "tornado" character appears on the title bar. The "tornado" character means that Buddy is "speeding your access to the symbols." (Blue-key Settings screen.)
- The blue keys and their shifted symbols can be swapped. This is similar to the blue-key timer logic, above, except that the swap mode is always on in the specified applications. This feature is most useful in Lotus 1-2-3 and the Calc Solve Editor.
- For all of the above keyboard translations, if the action taken by Buddy is NOT desired, push the DEL key. Buddy will undo the action.
- Double clicking any blue key will activate the application assigned to the CTRL-version of the blue key. This feature is controlled by a checkbox in the EXM ("d-blue"). This feature does not work while in DOS.
- You can use the EXM to remap the blue keys (Blue-key Settings screen). For example, you can assign the "cc:MAIL" key to start BUDDY.EXM and the "LOTUS" key to start DOS. You must know the 16-bit hexadecimal key codes to program this feature. You can also use this feature to disable one or more of those blue keys by specifying an invalid keystroke. Note that you can determine the hexadecimal value for most keystrokes using the Fn-K feature, described above. This feature does not function in DOS.
- In applications other than Memo, if a gray key is pushed immediately after the MENU key, the MENU key will be converted to a SHIFT. This corrects accidental hits of the MENU key when SHIFT was intended. In Memo, the combinations of MENU-numeral have special significance (see "Memo Features.").
SmartCaps® Features
Throw away your shift keys! SmartCaps, coupled with the double-click and blue-key logic, allows you to type text without ever hitting the shift key.- The first letter of sentences will be capitalized automatically.
- Shifted gray-key punctuation marks (quote, apostrophe, colon, question mark, etc.) will automatically be entered without having to hit the shift keys. In cases where a punctuation mark appears at the beginning of a word, Buddy will wait until the first letter of the word is typed before going back and re-entering the punctuation mark. The automatic shifting is context-based, so you can still enter numerals without confusion in ordinary text.
- The words "I," "I'm," "I'll," etc., will automatically be capitalized and punctuated.
- Proper nouns can be capitalized by double-clicking the first letter.
- Abbreviations can be capitalized by double-clicking each letter (d-letter) or by pushing "." just before the first letter (autocaps). Don't use both; double-click each letter will not work if autocaps is enabled.
- Double-letters that appear in the middle of words (specifically when they follow a lower-case letter) will not be converted to a capital letter.
- Pushing a blue key within a certain length of time after a letter or gray key will enter the shifted blue-key symbol.
- Pushing "DEL" immediately after Buddy does any of the above translations will restore the original keystrokes. This may be necessary if you want "Wee..." as in "Weekly" but get "WE...". In the case of a blue-key translation, the DEL key will also start the intended blue-key application.
- Pushing "." just prior to typing a word will automatically capitalize the word. (This is called "autoCaps.") If you have SmartCaps on, AND if you have the autocaps checkbox on ("dot after white-space toggles caps lock"), then d-letter will only operate on the first letter of a word. Thus, "llee" will be "Lee" and "bbeer" will be "Beer". If you want to capitalize an entire word, then you must either use the SHIFT key or push the period key just prior to typing the word.
- [New in version 3] If "dot after white-space toggles caps lock" is on, a dot after white-space will temporarily inhibit d-gray. Use this mode to enter a number with doubled digits.
SmartCaps can be toggled on and off by pushing Fn-S while in an application that has SmartCaps enabled. When SmartCaps is turned on in Memo or full-screen notes, the word "SmartCaps" will appear on line one of the display. By default, SmartCaps is only active in Memo (even if it is left on while using other applications). However, SmartCaps can be used in the other applications according to EXM settings.
Example: Start Memo, turn on SmartCaps (push Fn-S), and type the following paragraph, just as it appears below. Do not touch the SHIFT key.
at the time, i didn6t understand the problem4 i wasAs you type, Buddy will change it to the following:
confused. *never mind,* he said, *we6ll take care of
it.*
At the time, I didn't understand the problem; I wasIt might require a few minutes of practice before you become comfortable with the interaction of SmartCaps, the double-click logic, and the blue-key logic with your normal typing style.
confused. "Never mind," he said, "we'll take care of
it."
The caps-lock state can be toggled using a single keystroke to permit easy capitalization of a word or sequence of words. If this "autocaps" feature is enabled, the "." key can be pushed at the start of a word (that is, after any white space) to toggle the caps lock state. You can also set Buddy to remove the caps lock state at the end of the word (when the next white-space character is typed), thus allowing an entire word to be capitalized with only one extra keystroke. Alternatively, you can have Buddy leave the caps lock state as-is until you toggle it again. If you really want a "." at the start of a word, just push the "." twice. Doing so will restore the original caps lock state and display the character.
Common abbreviations will not trigger the end-of-sentence logic. For example, the periods in "i.e.", "e.g.", "etc.,", and "vs." will be ignored. Note that "etc." (no comma) will be treated as the end of a sentence, while "etc.," (with a comma) will not.
A special post-gray checkbox ("Use my specified d-gray characters") will cause SmartCaps to use your specified d-gray characters instead of the shifted characters (symbols) normally assigned to post-gray keys. This feature can be used to assign umlauts or accented characters to the gray keys and have Buddy automatically use those characters as if the gray key had been double-clicked. International users could use this feature to assign umlauts and accented characters to some of the numeral keys.
Note: On the 100LX, the numeric keys are gray in color. However, on the 200LX, those keys are almost black. Regardless of the machine you are using, terms such as "post-gray" and "d-gray" refer to features assigned to the numeric keypad.
Yet another checkbox enables a special international mode where, if d-gray is OFF (via Fn-G) and SmartCaps is on, then:
- The numeral keys take on their d-gray value without d-clicking. If the letter is at the start of a sentence, SmartCaps will try to capitalize the character.
- AutoCaps (dot after white space) should work on the characters.
- Comma after white space will restore the numeral keys until the next white space. Use this mode to enter a number. For example:
You type: "i have ,350 .big marbles." To get: "I have 350 BIG marbles."
Another checkbox enables and disables the capitalization of the word "I". If you have that box checked, then SmartCaps works as it used to in version 1 -- that is, the English word "I" will be capitalized. Writers of only English should read no further; otherwise you will become hopelessly confused. OK, just remember, I warned you. If the `i' box is unchecked, then, by default, Buddy will not capitalize "i". However, if you push DEL after typing `i'-space (two keystrokes), then Buddy will go back, capitalize the `i', and thereafter automatically capitalize the word "i". Later, if you push DEL after `i'-space (Buddy will be displaying `I'-space), Buddy will go back, convert the `i' to lower-case, and thereafter not capitalize the word "i". Thus, if the `i' checkbox is NOT checked, you can toggle the internal mode on and off by pushing DEL immediately after `i'-space (or `i'-comma). The EXM checkbox will not be changed. There is no indicator for this internal mode switch, but if you type `i'-space and it comes out wrong, just push DEL to correct the error and the state will be toggled, too. This feature is provided for users who often write in numerous languages, including English, and it's much easier to use than to explain.
SmartCaps is good, but it isn't perfect. There may be a few cases where SmartCaps interacts with other features or it may behave strangely, depending on the applications you use, the nature of the text you are typing, and your writing style. There is no way for Buddy to always know what is expected since it cannot read your mind (but I'm working on that ability!). In some applications, like Phone, it may make no sense to use SmartCaps. Doing so could give you "DumbCaps."
There are some cases where you must be aware of the interactions and decide whether or not to use SmartCaps if the conflict is troublesome. For example, in the DOS program known as "QEdit," some escape sequences may appear to be inoperative. After "ESCAPE O R", the number keys are ignored. But, there is a work around. Push the "0" key, DEL, backspace, or an arrow key before entering the number. (Be creative.)
If you don't like what SmartCaps is doing, turn it off (uncheck the application boxes on the SmartCaps settings screen and/or push Fn-S).
Open, Insert, and Save File Windows
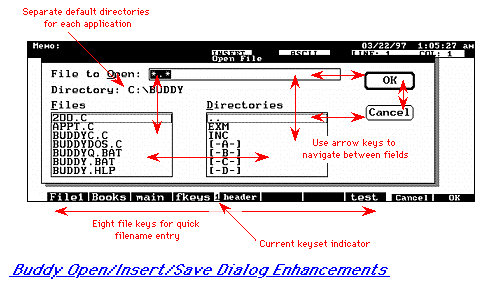
When at any "Open File," "Insert File," or "Save As" window, F1 through F8 become preset file selection keys, complete with labels for each key (File-keys Settings screen). There are three separate sets of key assignments (called "keysets"). Each application has a default keyset, which you can specify via settings in the EXM (File-keys Settings screen). The PLUS key will rotate the keysets. When the file selection keys are active, the current keyset is indicated by a small numeral displayed between the F4 and F5 function-key labels.In the Open/Insert/Save File windows, you can save a pathname to an F-Key location by typing the file name (or highlighting it) and pushing SHIFT-Fx, where "Fx" is F1 through F8. If the F-Key label has not been preset, the file name will show above the F-Key. (Note: before your next reboot, you must at least start and quit the EXM in order for those new settings to be saved to the ENV file.) You can also change the settings using the EXM.
In the Open/Insert/Save File windows, DEL DEL will call up a default directory. Each application has its own default directory. If you push SHIFT-DEL, the current directory will be saved as the new default directory for the application. (Note: before your next reboot, you must at least start and quit the EXM in order for those new settings to be saved to the ENV file.) You can change the default settings using the EXM (Default Directories Settings screen).
In the Open/Insert/Save File windows, the arrow keys can be used to navigate among the controls (in addition to the TAB and SHIFT-TAB keys). The up, down, left, and right arrows will move the cursor as you might expect. If the cursor is at the end of the top field (file name entry line), pushing the right arrow key again will move the cursor to the directory window. (Example screen image.)
In the Open/Insert/Save windows, when the cursor is in the file list (left side), the backslash key will move you up one directory level ("..") or, if you are at the root level, change drives between "A" and "C".
In the Open/Insert/Save File windows when the cursor is in the file list (left side), a letter key will cause the list of files whose first letter matches the key to be positioned at the TOP of the window. This makes it easier to locate the file you want if there are numerous files that match the first letter. (I kept overshooting the desired file when trying to find it because I could not see below the window.) You can still tap the (same) letter key or the up/down arrow keys to move through the list.
In the Open/Insert/Save File windows, if you get a file not found error, you can start re-typing a file name without having to push ESC first. Also, the arrow keys will return you to the application and move the cursor.
Whenever a file name is being typed into a field known to contain only a file name (e.g., in the Open File or Save File windows), the "=" key will be mapped to a colon. This feature only works in the open, save, and insert windows to which Buddy adds easy navigation.
You can double-click the backslash key to get a single colon. If you triple-click the backslash, you will get ":\". This feature must be enabled via a setting in the EXM (Keyboard Translation Setting screen).
Application Linkages
Memo, Phone, Appointment, Todo, Database, NoteTaker, and Full Notes can be linked.
Links to Database Applications
If you push Fn-P, Fn-N, or Fn-D while the cursor is in a note field or a Memo file, the word under the cursor will be "located" in Phone, NoteTaker, or Database, respectively. (A setting is provided in the EXM that forces Buddy to always look at the first word of the note field.) If the cursor is not in a note field, the first word of the note field will be used for the locate.It is possible to exclude words from the search so that different words can be used for the three application links. This allows you to have one word that will be used for a Phone link search, and other words for Database and NoteTaker searches. This is done by putting "N@", "P@", or "D@" before the word to indicate to which of the three applications the word applies. For example, "P@smith" means that the word "smith" applies only to Phone links (Fn-P). If you push Fn-D, "smith" will not be used; instead, the next non-@-prefixed word or the next word that starts with "D@" will be used.
Bug alert: Buddy will use the wrong word if the word under your cursor is (1) the first word of a note field or Memo file and if that word is preceded by a space, or (2) the last word of a Memo file and it is not followed by a space. Go figure...
There is a checkbox in the EXM which will cause the database linkages (Fn-P, Fn-D, and Fn-N) to always be taken from the "Description" field. Thus, if you create an appointment by linking from the Phone application (using Fn-A), later you can link back to Phone via Fn-P without having to put anything in the notes field.
The EXM has an option to force an automatic open of the database card after linking from Appointment.
Links to Memo Files
If you push Fn-M while at or in a Memo, Phone, NoteTaker, or Database record or full-screen note, Buddy will search the current line and then the first page of the Memo text or "Note" field for a line that starts with a greater than sign (`>') and treat the text that immediately follows in column two as a file name. If the file name does not include a drive specification (no `:' in column three), then the current application's default directory (as maintained by Buddy) will be prepended to the file name. In any case, the resultant file will be called up in Memo. Since the NEXT line is searched, you can have multiple links to different Memo files and move the cursor to select the link that should be used. Example linkage lines:>testfile.docIf you need Fn-P/D/N links and memo links (`>') in the same note field or Memo file, put the P, N, and/or D links BEFORE the memo link. That way, the filename in your memo link will not be taken as a search word. Also, due to a quirk in the 100LX/200LX, do not put a space before a word if it is the first word in the file or note.
>c:\_dat\info.xyz
There are also quick startup linkages from the Filer to the other built-in applications. See "Filer Features.".
When you link to a Memo file, the cursor will be moved to the previously-seen position or to the end of the file, based on two settings in the EXM. See the "Memo Features" section for details.
Links to Appointment Book
Fn-A links to the Appointment Book and creates a new appointment. Fn-T links to the Appointment Book and adds a new todo.From the list or record view in Phone, Database, or NoteTaker, the first Smart Clip starting with `>' (if any) is used to create a new appointment (or todo).
In a note field or a Memo file, the entire line under the cursor (up until two or more blank spaces) is used to create the new appointment or todo entry.
Special Features for International Users
Certain features of Buddy have been incorporated to make typing easier for international (non-English) users. All of these features still operate only on an English version of the 100LX or 200LX. For complete details on these features, see other sections in this manual.
- Memo:
- The change case feature (F8) will handle accents, umlauts, and so on.
- Memo:
- There is a checkbox to require the MENU key before any Buddy Fn-key feature. If MENU has not been pushed, the original Fn-key function is used.
- Memo:
- There is a checkbox to disable the Fn-I, Fn-T, and Fn-A Buddy features. Those keys are needed to produce certain international characters.
- SmartCaps:
- There is a checkbox to enable or disable capitalization of the word "i". If this box is not checked, the internal mode can be toggled using DEL. See "SmartCaps Features," for details.
- SmartCaps:
- You can use the characters you have specified in the d-gray logic as post-gray characters (instead of the normal shifted symbols). You can use this feature to assign accented characters or umlauts to the gray keys. Also, if d-gray of OFF, you can cause the gray keys to produce umlauts, etc., without having to double click, push Shift, or push Fn. See "SmartCaps Features," for details.
Battery Display and Timeout Features
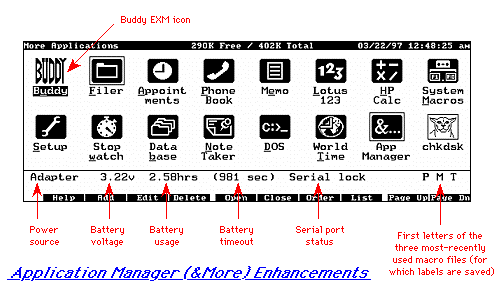
The following features operate in Filer and [new in version 3] the icon view of the Application Manager (&More). The items are displayed on the Filer title bar or at the bottom of the Application Manager icon view screen.Sample displays:
Adapter 3.22v 2.43hrs (900 sec) Serial lock qFiler screen image.
Battery 3.04v 5.73hrs (344 sec) Serial on Q
Application Manager screen image.
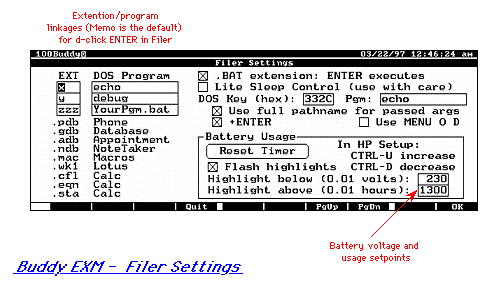
The power supply source ("adapter" or "battery") is displayed. "Charging" is displayed if the AC adapter is plugged in and your NiCads are being charged. Also, the main battery voltage and the battery usage time is shown. The battery timer will be updated in NVRAM even if Buddy is off via CTRL-MINUS or while you are in DOS. You can reboot when Buddy is off or directly from DOS without losing battery time accounting. If Buddy is disabled via CTRL-MINUS, the battery voltage and related information on the title bar is turned off. This will remind you that Buddy is inactive. Although Buddy may be turned off, it must remain loaded for the battery timer to be operational.
You can specify a particular voltage value below which the battery voltage will be highlighted in reversed video (that is, normal video) on the title bar. Also, you can specify a particular time value after which the battery timer will be displayed in reversed video on the title bar. If you so specify, the highlights will flash. Use this feature to alert yourself when your batteries are about to need changing or charging. The values you chose should be based on your previous experience with your palmtop battery usage. (Filer Settings screen.)
See "HP Setup Features." for additional information about battery voltages and battery charging.
The current value of the timeout counter is displayed (just after the battery timer). When counting down, some numbers may appear to be skipped due to display synchronization and round-off errors in Buddy. The value of the timer is saved across a reboot.
The state of the IR and RS232 ports is displayed. The PLUS key ("+") will turn the serial port on; MINUS ("-") will turn the port off. MINUS MINUS will "lock" the port off and try to keep it off. Important notes about the operation of the serial port: When you go to DOS, the "Enable Com1 Port in DOS" setting in HP Setup (MENU o c) takes effect. If you want the serial port to operate in DOS, that checkbox must be checked. Buddy can override that control to keep the port off ("lock" mode), but Buddy cannot force the port to go on if that checkbox is not checked. If you have the port enabled, then you can use Buddy to allow it to go on when you enter DOS or to lock it off. If you are in DOS, you can use ALT-PLUS to remove the lock state (thus allowing the port to go on) or ALT-MINUS to turn the lock state on (thus turning the port off).
The state of the beeper inhibit logic is shown (see "Fn-Q" in "General Features," above.) A "Q" means Fn-Q is on and the "restore" checkbox is off (very quiet mode). A "q" means Fn-Q is on, but the "Restore" checkbox is ON (mostly quiet mode).
Fn-PLUS increments the power-off timeout value by 10 seconds, and Fn-MINUS decrements the timeout value by 10 seconds.
If this feature is enabled via the EXM, the state of Lite Sleep (LSon or LSoff) will be shown, too, on another line. You can toggle the Lite Sleep state via CTRL-L. Caution: if you turn Lite Sleep off, you may cause excessive battery drain. Do not enable this feature if you are unsure of its effect on your programs or machine.
Multiple Macro File Features
[Expanded in version 3.]At any time, you can easily command Buddy to load and scan any one of 36 different macro files. This gives you instant access to 360 macros. As in version 2, you can specify a different macro file for each application and Buddy will automatically switch to the proper file when necessary.
Feature Description
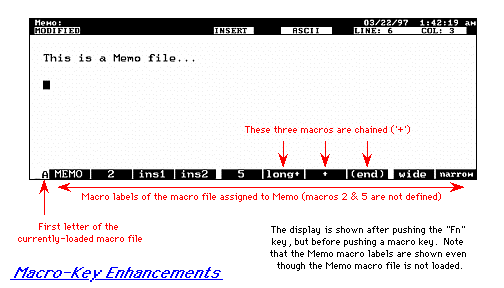
The multiple macro feature is enabled using the "Macro Files" checkbox on the Default Directories Settings screen of the Buddy EXM. A single letter code can be specified for each application that designates the first letter of the macro file associated with that application. For example, the macro file "FILER.MAC" could be associated with the Filer application, while "PHONE.MAC" is associated with the Phone application.- When you change macro files, Buddy will scan and retain the first seven characters (or the first word) of the description field of the macro. When you push the Fn key, Buddy will display the macro labels above the 10 macro keys and display the first letter of the currently-loaded macro file just to the left of the F1 key label (example screen image). Buddy displays the macro labels corresponding to the active application, if they are known, which may not be the labels of the currently-loaded macro file. Three sets of macro labels are saved (instead of just one as in version 2) for three different macro files. If the labels are unknown either because (1) the macro file has not been scanned, (2) the labels have been displaced by a more-recent macro file, or (3) particular macros have not been defined, Buddy will display numbers ("1" through "10"). Buddy makes a label using the first word of the macro description field, if specified, or otherwise the first few characters of the macro itself. (Example screen image) An EXM setting will cause a default label to be generated instead of using macro text with curly braces.
- When you push a macro key (e.g., Fn-F3), the proper macro file will be loaded (if necessary) and the labels saved, pushing out one of the older sets on a FIFO basis. Buddy will also automatically switch macro files when you record a macro (e.g., Fn-SHIFT-F3), if appropriate (the macro file feature is enabled and not temporarily inhibited).
- To specify that there is no particular macro file for a certain application, put a blank in the letter designation box for that application. If such an application is active, the macro file will not be changed when you push a macro key. (This is a slight change from version 2 where the special character was a space.)
- At startup, Buddy automatically loads, reads, and saves the macro labels of up to three macro files whose designations in the Buddy EXM are set to upper-case letters (e.g., `M' instead of `m' for the Memo application). Next, Buddy loads the macro file starting with `@' (e.g., "@BOOT.MAC") if that feature is enabled and if such a file exists. Finally, Buddy runs the macro named "@boot" of the last loaded macro file, if such a label exists. If the macro name is "@boot+", macro chaining occurs (see below). Note that the character case is important in the macro name (that is, "@Boot" will not work). You can use this feature to automatically open your favorite application or change the machine's configuration when you reboot. Also, remember that no Buddy features can be invoked from a macro, so you should record the @boot macro with Buddy turned off.
- Macro chaining: After executing a macro, Buddy will automatically chain to the next macro if the macro label ends with a plus sign (`+'). Chaining will continue until a macro not having a label ending with a plus sign or macro F10 or has been executed. A macro label consisting of only a plus sign is sufficient to cause chaining. (Example image.)
- &More: The letters corresponding to the three known sets of macro labels will be shown in the lower right corner (screen image). For example, "M P @" means Buddy knows the labels for "m---.mac", "p---.mac", and "@boot.mac". ("---" means anything.) Also, the next file to be dumped will be "@boot.mac" because it's last on the list.
- Fn-\ (backslash) prepares Buddy to perform a macro file load operation. If the next character is another backslash, then Buddy will load and scan the macro file designated for the active application. (This is useful if Buddy does not know the labels and you've forgotten which macro key runs which macro.) However, if the next character is a letter or a numeral, Buddy will attempt to load and scan the macro file whose name starts with that character (and temporarily inhibit further automatic loading, see below). This feature operates even if the "Macro Files" checkbox is off, thus allowing you to change to another macro file on command even when Buddy is not doing it automatically. When you push Fn, the first letter of the currently-loaded macro file is displayed to the left of the F1 label.
To permit you to load an arbitrary macro file and invoke a macro therein if you have the "Macro Files" checkbox on, Buddy will temporarily inhibit automatic loads after you manually load a macro file (e.g., by entering "Fn-\v" to load VIC.MAC). Automatic operation will be restored when you push Fn-\ again (even Fn-\-ESC) or activate the EXM.
Invoking a macro will not change the temporary inhibit state.
When automatic operation is either temporarily inhibited or permanently disabled, the macro file letter shown to the left of the F1 key label will be in lower case. An upper-case letter indicates the currently loaded macro file AND that the macro file designated for the current application will be loaded automatically, if necessary, if you push a macro key.
Macro Feature Operation Summary
Keystroke Temporary
inhibitKeystroke action Fn-\\ turn off Load and scan the proper macro file for the current app Fn-\x turn on Load and scan macro file X---.MAC (`x' is a letter or numeral) Fn-\ESC turn off No other action BUDDY.EXM turn off Start EXM Fn-Fx no change Execute macro ("Fx" is F1 to F10) Fn-SFx no change Record macro
Macro File
checkboxTemporary
inhibitLetter Macro key labels off (don't care) lower case Shown if know, else numbers on off upper case Shown if know, else numbers on on lower case Shown if know, else numbers
Letter Action when a macro key is pushed (before execution) lower case No change to the macro file upper case Load the proper macro file (if not already loaded)
Macro EXM Settings Summary (screen image)
There are two checkboxes that control startup behavior:
- "MF" = checkbox "Macro Files (1st ltr)"
- "@B" = checkbox "@boot.mac at startup"
MF @B Startup action off off Do not scan any macro files. Whatever file is already loaded remains loaded. off on Load the file @BOOT.MAC and read the labels therefrom. on off Scan the labels of the currently loaded macro file plus the macro files having upper-case letter designations, and leave the last such file loaded. It only makes sense to have three or fewer upper-case letter designations. on on Scan the labels of the currently loaded macro file plus the macro files having upper-case letter designations, then load @BOOT.MAC and read the labels therefrom. It only makes sense to have two or fewer upper-case letter designations.
In the last three cases, after the last file has been loaded, the first macro named "@boot", if one exists, is invoked.
Notes About Playing And Recording Macros
Buddy features cannot be invoked from a user macro key. User key macros must use the conventional HP 100LX/200LX keystroke sequences. Also, when "recording" a user macro, be aware that it is recording Buddy's keystrokes, which are not necessarily the same as yours. The recorded keystrokes appropriate in one case may not be correct for a similar situation (different file or application states may exist).
 [Top] --
[Buddy Home] --
[Contents] --
[Screen images] --
[Support]
[Top] --
[Buddy Home] --
[Contents] --
[Screen images] --
[Support]
Updated: March 28, 1997